Tuesday, July 16, 2013

Linux Add User To Group

How can I add a user to a group under Linux operating system using command line options?
You can use the useradd or usermod commands to add a user to a group. The useradd command creates a new user or update default new user information. The usermod command modifies a user account and it is useful to add user to existing groups. There are two types of groups under Linux operating systems:
  1. Primary user group.
  2. Secondary or supplementary user group.
All user account related information are stored in the following files:
  1. /etc/passwd - Contains one line for each user account.
  2. /etc/shadow - Contains the password information in encrypted formatfor the system's accounts and optional account aging information.
  3. /etc/group - Defines the groups on the system.
  4. /etc/default/useradd - This file contains a value for the default group, if none is specified by the useradd command.
  5. /etc/login.defs - This file defines the site-specific configuration for the shadow password suite stored in /etc/shadow file.

useradd Example - Add a new user to secondary group

You need to the useradd command to add new users to existing group (or create a new group and then add user). If group does not exist, create it. The syntax is as follows:
useradd -G {group-nameusernameIn this example, create a new user called vivek and add it to group called developers. First login as a root user (make sure group developers exists), enter:
# grep developers /etc/groupOutput:
developers:x:1124:
If you do not see any output then you need to add group developers using the groupadd command:
# groupadd developersNext, add a user called vivek to group developers:
# useradd -G developers vivekSetup password for user vivek:
# passwd vivekEnsure that user added properly to group developers:
# id vivekOutput:
uid=1122(vivek) gid=1125(vivek) groups=1125(vivek),1124(developers)
Please note that capital G (-G) option add user to a list of supplementary groups. Each group is separated from the next by a comma, with no intervening whitespace. For example, add user jerry to groups admins, ftp, www, and developers, enter:
# useradd -G admins,ftp,www,developers jerry

useradd example - Add a new user to primary group

To add a user tony to group developers use the following command:
# useradd -g developers tony
# id tony
Sample outputs:
uid=1123(tony) gid=1124(developers) groups=1124(developers)
Please note that small g (-g) option add user to initial login group (primary group). The group name must exist. A group number must refer to an already existing group.

usermod example - Add a existing user to existing group

Add existing user tony to ftp supplementary/secondary group with the usermod command using the -a option ~ i.e. add the user to the supplemental group(s). Use only with -G option:
# usermod -a -G ftp tonyIn this example, change tony user's primary group to www, enter:
# usermod -g www tony

usermod command options summary

OptionPurpose
-a
--append
Add the user to the supplementary group(s). Use only with the -G option.
-g GROUP
--gid GROUP
Use this GROUP as the default group.
-G GRP1,GRP2
--groups GRP1,GRP2
Add the user to GRP1,GRP2 secondary group.

A note about security

If you add or delete user to existing group, you must change the owner of any crontab files or at jobs manually. You must make any changes involving NIS on the NIS server too.

A note about GUI tool

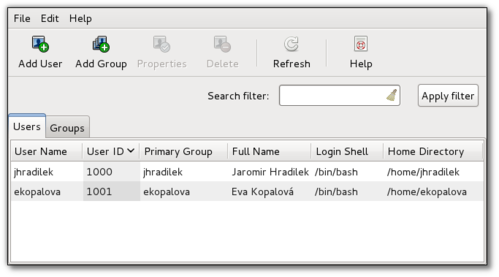
You will probably find the use of the GUI tool easy. KDE user can use KUser tool and the GNOME user can use users-admin tool called system-config-users:
# system-config-usersSample outputs:
Fig.01: User Manager Tool in action (image credit Fedora project)
SEE ALSO
For more information type the following command at the shell prompt:
$ man usermod
$ man useradd
Wednesday, July 10, 2013

Sqoop – basic data import/export

As I was exploring the Hadoop eco-system, I came across this tool called ‘Sqoop’. It is termed as ‘Sqoop’ to denote ‘SQL to Hadoop’ functionality. Sqoop is a wonderful tool to transport data from Hadoop ecosystem such as HDFS/Hive to Relational databases and vice-versa.
I just wanted to blog about it mentioning its basic import and export functionality. I shall try to show an example in which a table is imported to HDFS from a relational database and export it back on to the database. To demonstrate this, the following are used:
Relational database – MySQL
Linux distro – Red Hat Enterprise Linux Server release 5.3 (Tikanga)
Hadoop ecosystem – Cloudera CDH3u3
IMPORT DATA FROM A RELATIONAL TABLE TO HDFS
Firstly, let us create a table on MySQL database.
1. Create a database.
mysql> create database sqoop_tutorial;
Query OK, 1 row affected (0.00 sec)
2. Create a table.
mysql> use sqoop_tutorial;
Database changed
mysql> CREATE TABLE employee (id INT, name VARCHAR(20));
Query OK, 0 rows affected (0.12 sec)
mysql> show tables;
+————————–+
| Tables_in_sqoop_tutorial |
+————————–+
| employee                 |
+————————–+
1 row in set (0.00 sec)
3. Insert values into the table.
mysql> INSERT INTO employee(id,name) VALUES(1,”employee1″);
Query OK, 1 row affected (0.04 sec)
mysql> INSERT INTO employee(id,name) VALUES(2,”employee2″);
Query OK, 1 row affected (0.02 sec)
mysql> INSERT INTO employee(id,name) VALUES(3,”employee3″);
Query OK, 1 row affected (0.01 sec)
mysql> INSERT INTO employee(id,name) VALUES(4,”employee4″);
Query OK, 1 row affected (0.00 sec)
mysql> INSERT INTO employee(id,name) VALUES(5,”employee5″);
Query OK, 1 row affected (0.03 sec)
mysql> select * from employee;
+——+———–+
| id   | name      |
+——+———–+
|    1 | employee1 |
|    2 | employee2 |
|    3 | employee3 |
|    4 | employee4 |
|    5 | employee5 |
+——+———–+
5 rows in set (0.00 sec)
4. Now let us import this table ‘employee’ on to HDFS.
We need to run the following command.
bash [~]$ sqoop import –connect jdbc:mysql://localhost/<database> –table <table_name> –username <username> -P –target-dir <HDFS_Location> -m 1
Our command would be as follows:
bash [~]$ sqoop import –connect jdbc:mysql://localhost/sqoop_tutorial –table employee –username devbld -P –target-dir /usr/devbld/employee -m 1
After we run this, we may face the following error.
Unable to load com.mysql.jdbc.Driver
To workaround this, download the jar from http://www.mysql.com/downloads/connector/j/ and copy it to your ‘lib’ of sqoop (say, /usr/lib/sqoop/lib/).
Run the command again, this should solve the problem.
That creates a file on HDFS with data from the table. We can see the content of the tables in the file.
bash [~]$ hadoop fs -ls /usr/devbld/employee
Found 3 items
-rw-r–r–   1 devbld supergroup          0 2012-08-18 13:23 /usr/devbld/employee/_SUCCESS
drwxr-xr-x   – devbld supergroup          0 2012-08-18 13:23 /usr/devbld/employee/_logs
-rw-r–r–   1 devbld supergroup         60 2012-08-18 13:23 /usr/devbld/employee/part-m-00000
bash [~]$ hadoop fs -cat /usr/devbld/employee/part-m-00000
1,employee1
2,employee2
3,employee3
4,employee4
5,employee5
EXPORT DATA FROM HDFS TO RELATIONAL TABLE
1. Let us create a table on the database into which we want our data to be exported. Let us name it ‘employee_exported’.
mysql> CREATE TABLE employee_exported (id INT, name VARCHAR(20));
Query OK, 0 rows affected (0.01 sec)
2. Run the following command to export the data.
bash [~]$ sqoop export –connect jdbc:mysql://localhost/sqoop_tutorial –table employee_exported –export-dir /usr/devbld/employee –username devbld -P -m 1
3. Now, we see the contents of the table to find the data exported from HDFS.
mysql> select * from employee_exported;
+——+———–+
| id   | name      |
+——+———–+
|    1 | employee1 |
|    2 | employee2 |
|    3 | employee3 |
|    4 | employee4 |
|    5 | employee5 |
+——+———–+
5 rows in set (0.00 sec)

References:

Wednesday, June 26, 2013

hadoop


Open the Two files and paste the below two lines.
deb http://ppa.launchpad.net/webupd8team/java/ubuntu quantal main
deb-src http://ppa.launchpad.net/webupd8team/java/ubuntu quantal main

Now Follow from the Step 7

The Below link for setup a Apache Hadoop in Multi Node Cluster (Apache Hadoop Version is 1.0.4)
http://www.michael-noll.com/tutorials/running-hadoop-on-ubuntu-linux-multi-node-cluster/

Finally, i didnt tried HBase so you get it from the hbase.apache.org or cloudera sites.

Thursday, June 20, 2013

String Function in Java


Java: Trim an string

Find a way to trim the last character of a StringBuilder or a String for that matter.

If you have a String called 's'
Code:
s.substring(0, s.length()-1);
If you have a StringBuilder 'sb'
Code:
sb.deleteCharAt(sb.length()-1);

Java: Sort an array

Description

The java.util.Arrays.sort(int[]) method sorts the specified array of ints into ascending numerical order.

Declaration

Following is the declaration for java.util.Arrays.sort() method
public static void sort(int[] a)

Parameters

  • a -- This is the array to be sorted.

Return Value

This method does not return any value.

Example:

int[] array = new int[10];
Random rand = new Random();
for (int i = 0; i < array.length; i++)
    array[i] = rand.nextInt(100) + 1;
Arrays.sort(array);
System.out.println(Arrays.toString(array));
// in reverse order
for (int i = array.length - 1; i >= 0; i--)
    System.out.print(array[i] + " ");
System.out.println();

Java: substring an String

Description:

This method has two variants and returns a new string that is a substring of this string. The substring begins with the character at the specified index and extends to the end of this string or upto endIndex - 1 if second argument is given.

Syntax:

Here is the syntax of this method:
public String substring(int beginIndex)

or

public String substring(int beginIndex, int endIndex)

Parameters:

Here is the detail of parameters:
  • beginIndex -- the begin index, inclusive.
  • endIndex -- the end index, exclusive.

Return Value :

  • The specified substring.

Example:

import java.io.*;

public class Test{
   public static void main(String args[]){
      String Str = new String("Welcome to Tutorialspoint.com");

      System.out.print("Return Value :" );
      System.out.println(Str.substring(10) );

      System.out.print("Return Value :" );
      System.out.println(Str.substring(10, 15) );
   }
}
This produces following result:
Return Value : Tutorialspoint.com
Return Value : Tuto


Wednesday, May 15, 2013

How To Install TeamViewer In Linux


April 25th 2013,TeamViewer 8.0 is released for Linux Users makes it working in all the platform including Windows, Android, iOS and MAC OS X. TeamViewer is one of the popular Remote Desktop Client tool in Windows operating system and now you can install it in your Linux Machine too. TeamViewer can be used for remote control, desktop sharing, online meetings, web conferencing and file transfer between computers. To install TeamViewer administrator access is required, but once installed it can be run by any user.

How To Install TeamViewer in Linux (Ubuntu 13.04/Mint 14/Kubuntu 13/04/Lubuntu 13.04) [Graphical Installation]

For Debian, Mint, Ubuntu, Kubuntu, Xubuntu…download TeamViewer Debian Package 32bit version from  here and 64bit version from here.

how to install teamviewer in linux
Save the File TeamViewer._Linux.deb and open it using software Center (Ubuntu Software Center).
Click Install Button to proceed.
Team Viewer for Linux
An Authentication windows appear to put Root password
team viewer 8.0 for Linux
Click on Authenticate button to proceed.
Click on Accept License Agreement
team viewer 8.0
after Accepting the agreement the following windows appear.
run teamviewer in ubuntu 13.04
Put Partner ID  asking by your friend where the Same version of team viewer is installed same as mine shown in above image. After putting Parter ID TeamViewer asks for password of your friend system and you are done.
Enjoy Remote access using TeamViewer in Linux operating System. You can also Transfer files but the speed is not so good when it comes to transfer the files.

How To Install TeamViewer In Linux Using Terminal [Command Line Installation]

If you don’t want to use Graphical method(which is recommended by TeamViewer website) then you can use command line method to install TeamViewer in Linux.

How To Install TeamViewer In Ubuntu/Kubuntu/Mint/Lubuntu/Debian Using Terminal

Open Terminal ( by Pressing “Ctrl+Alt+T”)
For the 32-bit package:
  • sudo dpkg -i teamviewer_linux.deb
For the 64-bit package:
  • sudo dpkg -i teamviewer_linux_x64.deb
In case “dpkg” indicates missing dependencies, complete the installation by executing the following command:
  • sudo apt-get install -f

How To Install TeamViewer In Linux (RedHat, CentOS, Fedora, SUSE) Using Terminal

  • yum install teamviewer_linux.rpm (recommended, as it will install missing dependencies)
  • rpm -i teamviewer_linux.rpm
In case “yum” is asking for a missing public key, you can download it here and import the key by using following command:
  • rpm --import TeamViewer_Linux_PubKey.asc
After importing the public key, please execute the “yum”-command again to install the TeamViewer rpm.

How secure is TeamViewer?

According to TeamViewer Developers
“All TeamViewer versions use full encryption. Encryption is based on 1024bit RSA private/public key exchange and 256 Bit AES session encoding. This uses the same security level as https/SSL and is considered completely safe by today’s standards. The key exchange also guarantees that the data channel is completely encoded from client to client and that any routers or servers in between (including our routers) are unable to read or analyze the data stream. Security and privacy have always been a top priority during development.”

Sunday, February 10, 2013

Install Virtual Box on Ubuntu 12.10

VirtualBox is a powerful x86 and AMD64/Intel64 virtualization product for enterprise as well as home use. Not only is VirtualBox an extremely feature rich, high performance product for enterprise customers, it is also the only professional solution that is freely available as Open SourceSoftware under the terms of the GNU General Public License (GPL) version 2.

What is new in virtualbox 4.2.4
This is a maintenance release. The following items were fixed and/or added:
GUI: fixed validation warning on global settings / proxy page (4.2.2 regression, bug #11089)
GUI: fixed crash with multiple guest screens on certain conditions (OS X hosts only)
VBoxBalloonCtrl: fixed command line argument handling of ballooning module
VRDP: fixed occasional crash during a video playback in the guest (bug #11082)
BIOS: fixed broken DMI information (4.2 regression)
BIOS: workaround for booting from Windows 2000 floppy disks
EFI: fixed video mode selection loss on VM reboot (#10983)
Parallel: fixed parallel port printing failure/ paper queue empty error (Windows hosts only; bug #2226)
NAT: fixed crash on alias-less DNS responses when host-resolver is used
Storage: fixed hang under rare circumstances
Install VirtualBox 4.2.4 in ubuntu 12.10/12.04
Open the terminal and run the following commands
You need to edit /etc/apt/sources.list
gksudo gedit /etc/apt/sources.list
Add the following line
deb http://download.virtualbox.org/virtualbox/debian precise contrib
If you are running ubuntu 11.10 add the following line
deb http://download.virtualbox.org/virtualbox/debian oneiric contrib
Save and exit the file
Now install PGP key using the following command
wget -q http://download.virtualbox.org/virtualbox/debian/oracle_vbox.asc -O- | sudo apt-key add -
Update source list
sudo apt-get update
Install virtualbox
sudo apt-get install virtualbox-4.2
If you have problem with the above PPA you can download .deb package from here.Once you have deb package you can double click on it to install this package.