Tuesday, July 16, 2013

Linux Add User To Group

How can I add a user to a group under Linux operating system using command line options?
You can use the useradd or usermod commands to add a user to a group. The useradd command creates a new user or update default new user information. The usermod command modifies a user account and it is useful to add user to existing groups. There are two types of groups under Linux operating systems:
  1. Primary user group.
  2. Secondary or supplementary user group.
All user account related information are stored in the following files:
  1. /etc/passwd - Contains one line for each user account.
  2. /etc/shadow - Contains the password information in encrypted formatfor the system's accounts and optional account aging information.
  3. /etc/group - Defines the groups on the system.
  4. /etc/default/useradd - This file contains a value for the default group, if none is specified by the useradd command.
  5. /etc/login.defs - This file defines the site-specific configuration for the shadow password suite stored in /etc/shadow file.

useradd Example - Add a new user to secondary group

You need to the useradd command to add new users to existing group (or create a new group and then add user). If group does not exist, create it. The syntax is as follows:
useradd -G {group-nameusernameIn this example, create a new user called vivek and add it to group called developers. First login as a root user (make sure group developers exists), enter:
# grep developers /etc/groupOutput:
developers:x:1124:
If you do not see any output then you need to add group developers using the groupadd command:
# groupadd developersNext, add a user called vivek to group developers:
# useradd -G developers vivekSetup password for user vivek:
# passwd vivekEnsure that user added properly to group developers:
# id vivekOutput:
uid=1122(vivek) gid=1125(vivek) groups=1125(vivek),1124(developers)
Please note that capital G (-G) option add user to a list of supplementary groups. Each group is separated from the next by a comma, with no intervening whitespace. For example, add user jerry to groups admins, ftp, www, and developers, enter:
# useradd -G admins,ftp,www,developers jerry

useradd example - Add a new user to primary group

To add a user tony to group developers use the following command:
# useradd -g developers tony
# id tony
Sample outputs:
uid=1123(tony) gid=1124(developers) groups=1124(developers)
Please note that small g (-g) option add user to initial login group (primary group). The group name must exist. A group number must refer to an already existing group.

usermod example - Add a existing user to existing group

Add existing user tony to ftp supplementary/secondary group with the usermod command using the -a option ~ i.e. add the user to the supplemental group(s). Use only with -G option:
# usermod -a -G ftp tonyIn this example, change tony user's primary group to www, enter:
# usermod -g www tony

usermod command options summary

OptionPurpose
-a
--append
Add the user to the supplementary group(s). Use only with the -G option.
-g GROUP
--gid GROUP
Use this GROUP as the default group.
-G GRP1,GRP2
--groups GRP1,GRP2
Add the user to GRP1,GRP2 secondary group.

A note about security

If you add or delete user to existing group, you must change the owner of any crontab files or at jobs manually. You must make any changes involving NIS on the NIS server too.

A note about GUI tool

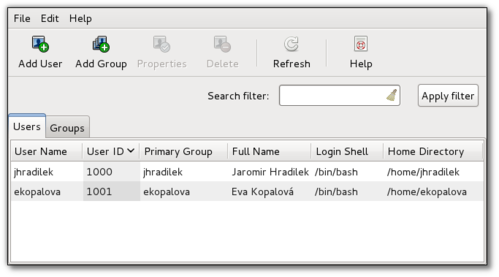
You will probably find the use of the GUI tool easy. KDE user can use KUser tool and the GNOME user can use users-admin tool called system-config-users:
# system-config-usersSample outputs:
Fig.01: User Manager Tool in action (image credit Fedora project)
SEE ALSO
For more information type the following command at the shell prompt:
$ man usermod
$ man useradd
Wednesday, July 10, 2013

Sqoop – basic data import/export

As I was exploring the Hadoop eco-system, I came across this tool called ‘Sqoop’. It is termed as ‘Sqoop’ to denote ‘SQL to Hadoop’ functionality. Sqoop is a wonderful tool to transport data from Hadoop ecosystem such as HDFS/Hive to Relational databases and vice-versa.
I just wanted to blog about it mentioning its basic import and export functionality. I shall try to show an example in which a table is imported to HDFS from a relational database and export it back on to the database. To demonstrate this, the following are used:
Relational database – MySQL
Linux distro – Red Hat Enterprise Linux Server release 5.3 (Tikanga)
Hadoop ecosystem – Cloudera CDH3u3
IMPORT DATA FROM A RELATIONAL TABLE TO HDFS
Firstly, let us create a table on MySQL database.
1. Create a database.
mysql> create database sqoop_tutorial;
Query OK, 1 row affected (0.00 sec)
2. Create a table.
mysql> use sqoop_tutorial;
Database changed
mysql> CREATE TABLE employee (id INT, name VARCHAR(20));
Query OK, 0 rows affected (0.12 sec)
mysql> show tables;
+————————–+
| Tables_in_sqoop_tutorial |
+————————–+
| employee                 |
+————————–+
1 row in set (0.00 sec)
3. Insert values into the table.
mysql> INSERT INTO employee(id,name) VALUES(1,”employee1″);
Query OK, 1 row affected (0.04 sec)
mysql> INSERT INTO employee(id,name) VALUES(2,”employee2″);
Query OK, 1 row affected (0.02 sec)
mysql> INSERT INTO employee(id,name) VALUES(3,”employee3″);
Query OK, 1 row affected (0.01 sec)
mysql> INSERT INTO employee(id,name) VALUES(4,”employee4″);
Query OK, 1 row affected (0.00 sec)
mysql> INSERT INTO employee(id,name) VALUES(5,”employee5″);
Query OK, 1 row affected (0.03 sec)
mysql> select * from employee;
+——+———–+
| id   | name      |
+——+———–+
|    1 | employee1 |
|    2 | employee2 |
|    3 | employee3 |
|    4 | employee4 |
|    5 | employee5 |
+——+———–+
5 rows in set (0.00 sec)
4. Now let us import this table ‘employee’ on to HDFS.
We need to run the following command.
bash [~]$ sqoop import –connect jdbc:mysql://localhost/<database> –table <table_name> –username <username> -P –target-dir <HDFS_Location> -m 1
Our command would be as follows:
bash [~]$ sqoop import –connect jdbc:mysql://localhost/sqoop_tutorial –table employee –username devbld -P –target-dir /usr/devbld/employee -m 1
After we run this, we may face the following error.
Unable to load com.mysql.jdbc.Driver
To workaround this, download the jar from http://www.mysql.com/downloads/connector/j/ and copy it to your ‘lib’ of sqoop (say, /usr/lib/sqoop/lib/).
Run the command again, this should solve the problem.
That creates a file on HDFS with data from the table. We can see the content of the tables in the file.
bash [~]$ hadoop fs -ls /usr/devbld/employee
Found 3 items
-rw-r–r–   1 devbld supergroup          0 2012-08-18 13:23 /usr/devbld/employee/_SUCCESS
drwxr-xr-x   – devbld supergroup          0 2012-08-18 13:23 /usr/devbld/employee/_logs
-rw-r–r–   1 devbld supergroup         60 2012-08-18 13:23 /usr/devbld/employee/part-m-00000
bash [~]$ hadoop fs -cat /usr/devbld/employee/part-m-00000
1,employee1
2,employee2
3,employee3
4,employee4
5,employee5
EXPORT DATA FROM HDFS TO RELATIONAL TABLE
1. Let us create a table on the database into which we want our data to be exported. Let us name it ‘employee_exported’.
mysql> CREATE TABLE employee_exported (id INT, name VARCHAR(20));
Query OK, 0 rows affected (0.01 sec)
2. Run the following command to export the data.
bash [~]$ sqoop export –connect jdbc:mysql://localhost/sqoop_tutorial –table employee_exported –export-dir /usr/devbld/employee –username devbld -P -m 1
3. Now, we see the contents of the table to find the data exported from HDFS.
mysql> select * from employee_exported;
+——+———–+
| id   | name      |
+——+———–+
|    1 | employee1 |
|    2 | employee2 |
|    3 | employee3 |
|    4 | employee4 |
|    5 | employee5 |
+——+———–+
5 rows in set (0.00 sec)

References: